Todays Mistletoe Make and Bake
designers of the day are:
ME – You are here.
Todays topic is…
What is your Go-To Holiday book?
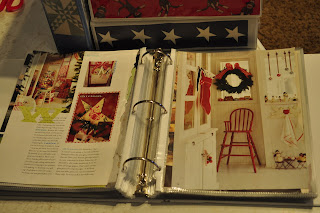
I have made my own Go-To Book. Now I know there are all kinds of great writers, artists and designers out there. Pick one? I just couldn’t do it. Maybe it is the middle child in me.
Make my own book? I have notebooks full of decorating ideas for the holidays. You may remember that yesterday’s post was Holiday Sanity Savers. This notebook is definetely not a sanity saver because there is no way my home would ever look like the pages out of a magazine. Someday, I may be able to twitch my nose and make it happen but until then I will enjoy using the pages as design inspiration.
I am not worried about anyone knocking on my door to publish my work of art.
I have notebooks for all kinds of topics, yet my favorites are Christmas and Fourth of July.
I have a book of articles about people. Some I know and consider my friends, some I hope to someday meet.
A book of gardening ideas for when my thumb finally turns green.
A book of quilting ideas.
A book of baby (grandbaby?) ideas.
I hope I have inspired you to make your own Go-To book.
Supply List: Large 3 ring binder.
(I use the kind with locking rings so the notebook doesn’t accidentally come open and the pages spill everywhere.)
Sheet protectors
Favorite pages from all your magazines
and many, many more.
Today is my turn to share a holiday project idea. Hope you enjoy it as much as I did making it.
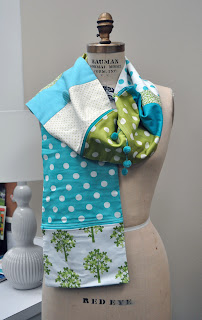
Girl Scout Scarf
8.5″ x 60″
A girl scout is always prepared. This scarf is full of hidden pockets and sections to hide just about anything.
I picked out with the back of the scarf first. I really wanted to use the Oliver + S interlock, so the scarf would drape nicely. This fabric determined the length of the scarf, approx 60″. I choose assorted prints at least 9″ wide. I decided to challenge myself on this project and try some new techniques.
ZIPPERS: Yikes, egads! I haven’t done a zipper since I flunked my sewing project in 5th grade. Due to the great tutorials and
Terry Atkinson’s colorful zippers I decided to make zipper pockets.
I added a bit of embroidery because I love the look but rarely sit still long enough to do any.
I used different feet on my machine and gave my #37 quilters’ foot a rest.
(feet used but you do not have to have them to make this project-Zipper foot on the zippers and walking foot for joining the interlock back to the pieced front.)
Supply List:
Backing 9″ x 60″ (backing can vary depending on the size of the person and the type of fabric.After making this one I think 6-7″wide is ample.)
Assorted fabrics for front
Additional items to personalize your scarf such as zippers, trims, medallions, floss.
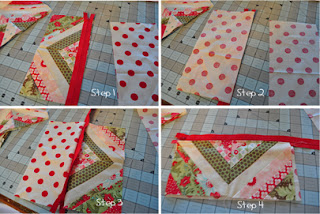
Zipper Tutorials:
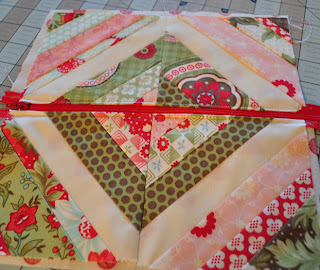
the pictures below are from the orphan block scarf shown below
Step1: Zipper and fabric right sides together.
Step 2: Add lining fabric right side together making a zipper sandwich.
Step 3: Sew along the edge of the fabric and zipper. Your piece will look like step 3.
Step 4: Fold the fabrics back wrong sides together and top stitch.
Repeat steps 1-4 on the other side of the zipper. Completed section shown above.
Once the zipper sections are completed, decide where you want the zipper pockets on your scarf. Continue joining fabrics together to make a 60″ long strip. Add assorted trims between fabrics paying close attention to placement on the scarf.
Do not add “things” to the middle section of the scarf. This area will be around the back of the neck and not seen. Add embroidery if needed.
Join the back to the front, right sides together, pinning sections in place.
Before sewing the scarf together, unzip one of the pocket sections half way. Sew the scarf all the way around the four sides. Trim the four corners to have nice sharp corners when the scarf is turned right side out. Use the opening at the zipper pocket to turn the scarf right side out. No hand work to close any openings.
Press the scarf. Top stitch above each of the zipper sections to create a pocket.
Ta Da! Just the perfect scarf to hold a spare key, cash, drivers license, chapstick, etc.
Additional ideas to Personalize your scarf:
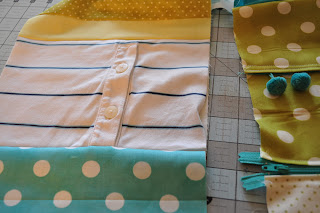
1. Add pieces of repurposed clothes. I added the button placket from my son’s shirt making an additional pocket. (I love buttons but did not want to tackle buttonholes)
This scarf is for his girlfriend. It will come in very handy next time he locks his keys in his car after a concert in the rain. Maybe I should go ahead and put a spare key in one of the pockets!
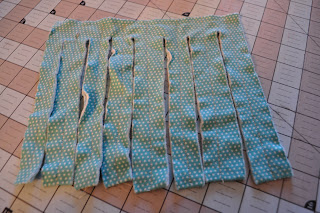
2. Add fringe made from interlock.
Keep in mind the size of the person you are making the scarf for so the added fringe will not make the scarf too long.
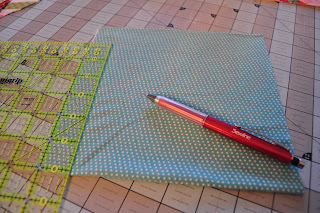
Cut an interlock section 9″ wide by 12″ long. Fold in half and sew along the 9″ side to hold in place. Mark every inch, sew from the bottom fold up 6″ on each of the markings. Cut 1/2″ from the sewn lines. Wet and toss in the dryer to fray the fringe. Size of fringe can vary according to what size you cut this section.
3. Monogram initials.
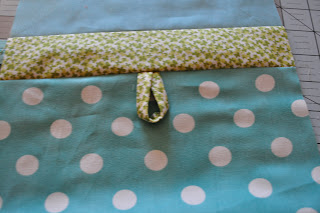
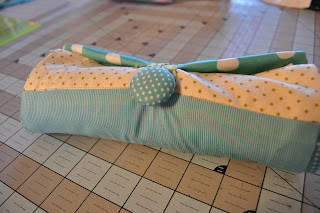
4. Add a loop and a covered button to roll the scarf into a handy take along.
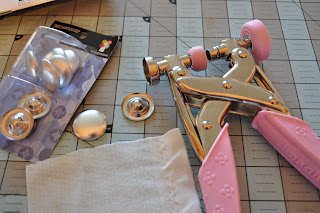
This was FUN to do using the brad/button maker. This item should be on everyones’ Christmas list. (Stock # 001309 suggested retail $29.99) It is on my list, I borrowed this one from Ducky. The package says (WARNING: Making custom brads and buttons has been shown to become addicting.)
5. Sew with unusual fabrics such as snuggles, old sweaters, sweatshirts, and school t-shirts.
6. Tuck a gift card in the pockets to surprise the recipent.
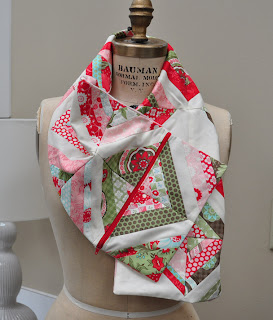
7. Use orphan quilt blocks for scarf sections. I wanted to use BLISS flannel for the back of the scarf so, once again I started with the back to determine the scarf. This one is 43″long.
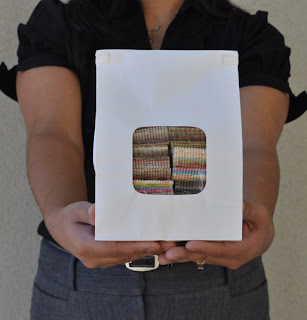
Leave a comment on my post today to win a chance at this adorable “cookie bag” of moda fabric. I will draw the yummy name and post the winner tomorrow morning.
Please make sure if you leave a comment that I have a way of getting
a hold of you if your name is drawn.
FUN FUN FUN
In the process of making my own idea book. I was just going to do all crafty projects but now I am thinking how nice a gifts/small projects and then one for quilting ideas… Hmmm…
What a cute scarf. You are right Always be prepared!!
What a fun scarf :o) Very intrigued with the idea book … I could make it for myself and escape to my wonderland of whichever world I decide just by pulling out my ideas binder. Wow! thank you so much … gardening, decorating, gifts, way cool! 🙂
Wow who would have thought all these year without such a handy scarf.
Thanks/
The scarf is awesome. I have 2 Girl Scouts at home who would love these! Thanks for the instructions.
This is a great scarf. Love it! Thanks so much! Love your idea of your own christmasbook!
What a great idea for your idea book, I'll have to give that a try I think. And the scarf is adorable☺
My first go-to book I started on Monday with this Mistletoe Make and Bake! I am printing everything out and hope to make and bake them all during the winter months.And…i have just added the i-top button tool to MY christmas list!
I too collect stuff that inspires me, but unfortunately it doesn't quite make it into a book as such…much better way to go! *smile*
Waht a cute idea & a perfect gift!
Love the scarf tutorial! I really need to start an inspired go to book. Thank you for the inspiration and bit of motivation to start one. Thanks for the giveaway and the blog hop!
Can't have too many scarves! Thanks for the giveaway!
Thank you very much. The scarf is awesome. I have do make myself one.
What an amazing scarf – so full of potential!!!! Thanks for sharing that and your great book of ideas. Ciao
Thanks for this giveaway. Checking out all the blogs is really fun!
I really need to start thinking about things for Christmas! Great giveaway 🙂
I need to make a go to book too, for my quilting, cooking, homemaking.. oh dear! Thanks for joining in on this great blog hop!
lv,
Joy
Great scarf pattern! And thanks for sharing the cool new tool that I now must have. 🙂
Thanks for doing this blog hop!
I love having all those ideas too – although I scan them into my computer now to eliminate actual clutter around here. Although, I could really stand to have some 'cookie' clutter – count me in!
ltenhage@gmail.com
Thanks for the awesome scarf pattern and recipe!
thank you for the scarf pattern…what a fun idea!
I have a lot of idea books happening for different topics, bags in one, Christmas in another, and so on, they are so handy!! Thanks for sharing such a great post with us!
I love the scarf! If i had the time I'd make one right now!
Thanks for the giveaway!
clara.cann@gmail.com
Very innovative scarf! Thanks for the chance to win!
That scarf is awesome! I also tear pages out of magazines when I see decorating ideas or crafty project I want to copy…but they're just all thrown together in file folders. You've inspired me to get organized!
What a great scarf! I love the idea book!
Thanks for sharing and a chance to win!
Cool scarf! I know a young lady who would adore one for Christmas, so I must get sewing. Thanks for being part of the blog hop. Happy quilting!
Like your book of ideas. Hum, so what filing drawer to I stash all those things in?
I keep notebooks to of all the patterns I want to make. At least they are all in one place and I can go right to them. Love the scarf.
I also have a 3 inch binder filled with torn out magazine pages! It's my wish book of ideas.
BTW-I would love a BAG of cookies :0)
Stefanie
Now that is a clever scarf. Always be prepared, That would be a great item to keep in the car in case of emergency or unexpected ill weather. Never thought of the go-to notebook for holidays. I have one for decorating and remodel. Very inspiring. Thank You.
I also have a collection of pictures/ideas that I've saved over the last few years but they haven't made it beyond a file folder in a drawer. Snickers cookies sound wonderful and potentially habit forming! Very cool scarf idea and tutorial. I'd sure love to give the Moda cookie bag a good home!
Love the scarf and I wish I was organized as you with your go-to notebook. Thanks!
This project is unbelievably cool! So versatile. Now, how did I miss the cookie recipe in this post? I'm going hunting now. Thank you…I LOVE Moda! ~Kathleen
brown.k [at] centurytel.net
Cool scarf! Stylish and functional. And I love your go-to book idea.
I, too, keep a project book, but I have to say, it's not as organized as yours. I love the idea of your scarf. It reminds me of the scarf that you can make with pockets at the ends for people like me with constantly cold hands. Thanks!
Cool scarf! Thanks for the pattern.
What a wonderful scarf!!! Every woman needs one of them. Thanks for sharing.
Are you kidding me…. what a great idea for a scarf! And to win another kind of bag full of cookies, too much!
I love your bliss scarf!! It is so fun!!
happyquiltingmelissa (at) gmail (dot) com
Oh what cute scarfs. Thanks for the giveaway. I love anything Moda.
Thanks for a great project!
Always interesting to see what fun projects a blog hop can come up with. Very cool scarf!! Thanks for the pattern and give-away!
What an adorable scarf! I wear one all the time during the cool months. Thanks for sharing your pattern and for the giveaway.
Day 4!
The scarf is pretty!!! Thank you for sharing.
We keep Ina's cookbook out, every year we have a cooking contest and the kids have be come quite the cooks because of it!
Have a great day!
Currently I have an overflowing go-to file folder. Maybe one day I will be organized enough to make it into a book. Great scarves!
I really LOVE the scarf! Cool Idea. You can wear holiday shopping and stash your cash inside! 🙂 Mary
maryp@marykay.com
The recipe the scarf..oh my goodness you rock for amazing ideas…thanks sew much..sew sweet of you ..
I too have a notebook of projects and room decor that I keep from magazines. Great directions in your scarf tutorial (plus that nifty gadget that I will add to my "wish list.") I retired as a teacher, so this would have been the perfect wardrobe addition – teachers always need handy places to store things (their own items, plus those they must confiscate from kids!) Thanks again!