Todays Mistletoe Make and Bake
designers of the day are:
ME – You are here.
Todays topic is…
What is your Go-To Holiday book?
I have made my own Go-To Book. Now I know there are all kinds of great writers, artists and designers out there. Pick one? I just couldn’t do it. Maybe it is the middle child in me.
Make my own book? I have notebooks full of decorating ideas for the holidays. You may remember that yesterday’s post was Holiday Sanity Savers. This notebook is definetely not a sanity saver because there is no way my home would ever look like the pages out of a magazine. Someday, I may be able to twitch my nose and make it happen but until then I will enjoy using the pages as design inspiration.
I am not worried about anyone knocking on my door to publish my work of art.
I have notebooks for all kinds of topics, yet my favorites are Christmas and Fourth of July.
I have a book of articles about people. Some I know and consider my friends, some I hope to someday meet.
A book of gardening ideas for when my thumb finally turns green.
A book of quilting ideas.
A book of baby (grandbaby?) ideas.
I hope I have inspired you to make your own Go-To book.
Supply List: Large 3 ring binder.
(I use the kind with locking rings so the notebook doesn’t accidentally come open and the pages spill everywhere.)
Sheet protectors
Favorite pages from all your magazines
and many, many more.
Today is my turn to share a holiday project idea. Hope you enjoy it as much as I did making it.
Girl Scout Scarf
8.5″ x 60″
A girl scout is always prepared. This scarf is full of hidden pockets and sections to hide just about anything.
I picked out with the back of the scarf first. I really wanted to use the Oliver + S interlock, so the scarf would drape nicely. This fabric determined the length of the scarf, approx 60″. I choose assorted prints at least 9″ wide. I decided to challenge myself on this project and try some new techniques.
ZIPPERS: Yikes, egads! I haven’t done a zipper since I flunked my sewing project in 5th grade. Due to the great tutorials and
Terry Atkinson’s colorful zippers I decided to make zipper pockets.
I added a bit of embroidery because I love the look but rarely sit still long enough to do any.
I used different feet on my machine and gave my #37 quilters’ foot a rest.
(feet used but you do not have to have them to make this project-Zipper foot on the zippers and walking foot for joining the interlock back to the pieced front.)
Supply List:
Backing 9″ x 60″ (backing can vary depending on the size of the person and the type of fabric.After making this one I think 6-7″wide is ample.)
Assorted fabrics for front
Additional items to personalize your scarf such as zippers, trims, medallions, floss.
Zipper Tutorials:
the pictures below are from the orphan block scarf shown below
Step1: Zipper and fabric right sides together.
Step 2: Add lining fabric right side together making a zipper sandwich.
Step 3: Sew along the edge of the fabric and zipper. Your piece will look like step 3.
Step 4: Fold the fabrics back wrong sides together and top stitch.
Repeat steps 1-4 on the other side of the zipper. Completed section shown above.
Once the zipper sections are completed, decide where you want the zipper pockets on your scarf. Continue joining fabrics together to make a 60″ long strip. Add assorted trims between fabrics paying close attention to placement on the scarf.
Do not add “things” to the middle section of the scarf. This area will be around the back of the neck and not seen. Add embroidery if needed.
Join the back to the front, right sides together, pinning sections in place.
Before sewing the scarf together, unzip one of the pocket sections half way. Sew the scarf all the way around the four sides. Trim the four corners to have nice sharp corners when the scarf is turned right side out. Use the opening at the zipper pocket to turn the scarf right side out. No hand work to close any openings.
Press the scarf. Top stitch above each of the zipper sections to create a pocket.
Ta Da! Just the perfect scarf to hold a spare key, cash, drivers license, chapstick, etc.
Additional ideas to Personalize your scarf:
1. Add pieces of repurposed clothes. I added the button placket from my son’s shirt making an additional pocket. (I love buttons but did not want to tackle buttonholes)
This scarf is for his girlfriend. It will come in very handy next time he locks his keys in his car after a concert in the rain. Maybe I should go ahead and put a spare key in one of the pockets!
2. Add fringe made from interlock.
Keep in mind the size of the person you are making the scarf for so the added fringe will not make the scarf too long.
Cut an interlock section 9″ wide by 12″ long. Fold in half and sew along the 9″ side to hold in place. Mark every inch, sew from the bottom fold up 6″ on each of the markings. Cut 1/2″ from the sewn lines. Wet and toss in the dryer to fray the fringe. Size of fringe can vary according to what size you cut this section.
3. Monogram initials.
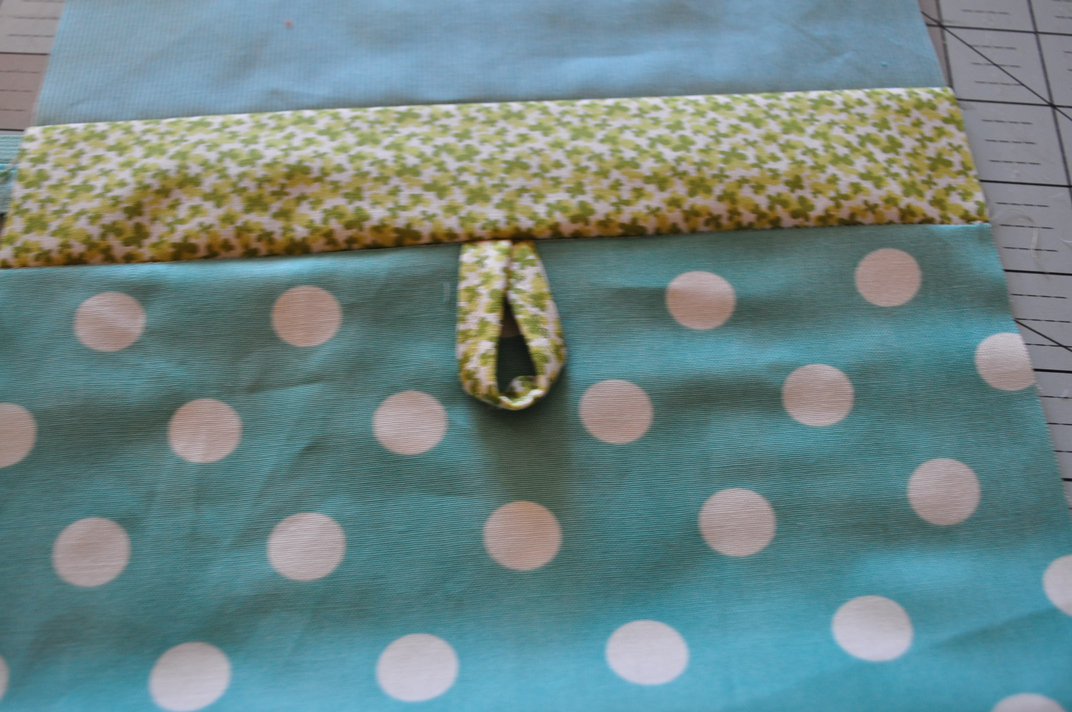
4. Add a loop and a covered button to roll the scarf into a handy take along.
This was FUN to do using the brad/button maker. This item should be on everyones’ Christmas list. (Stock # 001309 suggested retail $29.99) It is on my list, I borrowed this one from Ducky. The package says (WARNING: Making custom brads and buttons has been shown to become addicting.)
5. Sew with unusual fabrics such as snuggles, old sweaters, sweatshirts, and school t-shirts.
6. Tuck a gift card in the pockets to surprise the recipent.
7. Use orphan quilt blocks for scarf sections. I wanted to use BLISS flannel for the back of the scarf so, once again I started with the back to determine the scarf. This one is 43″long.
Leave a comment on my post today to win a chance at this adorable “cookie bag” of moda fabric. I will draw the yummy name and post the winner tomorrow morning.
Please make sure if you leave a comment that I have a way of getting
a hold of you if your name is drawn.


I have the brad/button maker thingey! But I bought mine about 18 years ago and Walmart. And it wasn't $30 way back then.
I should start some notebooks instead of keeping the whole magazine. It sure would free up some shelving space. Thanks for the great giveaway!
OOOooo… love the scarf idea, and the Go-To book is a great! love it!!
This is an amazing scarf. Can't wait to share it with my quilting friends. Does anyone hear "what a great Christmas gift??". I'm gonna have to make some.
Thanks for the pattern!! 🙂
Stephanie M
Miz Liza I like the book idea and will be getting right on that one. And the scarf is one that is going to be made this season I Love it.
But I really love what your little hands are holding. So yummy and tantilizing peeking out that window at me gives me the shivers!!
Quilter000 aka Patty Hall
I like the scarf. I used to keep binders and now keep folders of inspirational ideas for quilts. Many are in sheet protectors, active ideas are on a clipboard if I am sketching them and figuring out my own design. I have lots of folders on my computer and tag photos I scan in so can assemble sorted pictures/documents/pdfs sorted by same file prefix. Thanks for the ideas and please put my name in the hat for the drawing. alternate email mlwright29 (at) hotmail (dot) com
Great scarf pattern and it looks like fun to make!
Great Scarf . I love all the different options you can put in the scarf . Love the zipper. Thanks
Thanks for the clever idea book. The scarf looks like a great project.
Such a great idea for a scarf!! I used to be a Girl Scout-cute idea to "always be prepared." Also, I LOVE cookies of all kinds-the fabric ones on your blog, and the ones we eat-preferably with chocolate chips, but I'm not too fussy! Thanks for the great ideas!!
After serving as a girl scout leader for 12 years … I especially got a kick out of your project! Thanks!
Great idea to make a notebook. Cute scarf! Thanks for the instructions.
love your idea of a go to book. I have a very disorganized "IDEA FOLDER". Your idea is so much better.
http://randomthoughtsdoordi.blogspot.com/
What a unique scarf idea! thanks for sharing!
Very clever! Thank you,
Karen in Breezy Point
Clever idea and a good gift idea. thank you. Judy S.
What a great project, thank you
I love this idea!! Thanks so much for sharing!
Paulette
Love the scarf and the way you designed for it to roll up. Thanks for sharing this pattern.
What an absolutely brilliant scarf idea!!! And your samples are beautiful. Thanks for sharing your ideas and your recipes.
I love the zippered scarf idea.
Thank you for sharing all your great ideas…. I need an idea book! 🙂
SheilaC
I love the little zipper bag. Thanks for the chance to win the wonderful bag of fabric squares.