Category: Block Heads 3

BlockHeads- Magic Block and triangle papers giveaway

BLOCKHEAD WEDNESDAY

Today is a day of Magic. If you have even seen any of Lisa Bongean’s work then you will understand. Lisa creates magic with everything she touches.
She makes it all look so easy.
But the best thing about the process is that Lisa is a fantastic teacher sharing her tips on accurate piecing no matter how big or small.

My block is 8″ and I am happy with how it turned out but Lisa’s is 4″. You can see her block and get the pattern here.

Visit each of the designers listed below for their take on the MAGIC  block:

Be sure to check out the Block Heads Facebook Group and look for Block Heads 3 on Instagram – #modablockheads and #modablockheads3.

GIVEAWAY CLOSED-WINNERS NOTIFIED

Have you ever used triangle papers before? I am giving away an assortment pack to 3 of my readers. Just let me know why you need these by leaving a comment. The winner will be picked at random, Sunday, Feb 23rd.


Enjoy!

-modalissa

BlockHeads- Zen Chic- 2-12

Today’s Block Heads post is all about LOVE.

LOVE block by Zen Chic

Love from Brigitte Heitland of Zen Chic pictured with some of my pins that are a word and pic combo. No, I am not a train wreck or a drama queen but I am a Lucky Duck to be a part of the Moda Blockheads.

You can find the pattern here.

Last week was applique. This week is paper foundation piecing. Both are a challenge to think outside the box and do something a bit different.
I have become obsessed about this block and will be making it in all sizes, the 4″ block for a pincushion all the way up to the 12″ block for a pillow.

A few tips:

-Print on lightweight paper and tighten your stitch length making the paper easy to tear off. When tearing off the paper make sure you hold on to the seam allowance around the outside edge so the seam does not come apart.

– Lightly color in where you want the colors for the letters to be. It is very easy to get these transposed and end up having a letter E without a middle bar.

-Be sure and adjust your printing of the pattern pages as actual size. Quite often the default setting is fit to print and will make your blocks a tad smaller.

-Oversize all your fabrics. When paper piecing it is crucial to have a bigger piece and trim down instead of coming up short on an angle.

-If you have not paper foundation pieced, print extra pages of the size you need. I messed up on both of the letters V and E and needed to redo them.

-Have fun and experiment.

I was playing around with Brigitte’s newest fabric line, JUST RED to create a LOVE pillow. I was going for negative-positive color placement but was not happy with how it turned out so I will keep playing with color options. Remember when I said print multiple copies of the pages?

Thanks for being adventurous and learning new things!

I can’t wait to see what you create.

Visit each of the designers listed below for their take on the LOVE  block:

Thanks for stopping by. Be sure to check out the Block Heads Facebook Group and look for Block Heads 3 on Instagram – #modablockheads and #modablockheads3.

BlockHeads- Betsy Chutchian

Week 3

SO many great variations and color placements on everyone’s blocks. I have learned so much from watching the progress. Each week is a different kind of challenge to not only what fabrics am I going to use but how my sewing skills are going to be challenged. Today’s block is from Betsy Chutchian. I have known Betsy almost forever. I can’t really remember when we first met but we were both involved with local quilt shops and would run into each other at guild meetings and various quilt shows. I get to see her more now that we are both moda peeps.

I knew Betsy’s block was going to be a challenge for me but in a good way.

I’m not scared!

The half-square triangles are cut at 1 7/8″ so they finish 1″. I rounded up all my cutting to 2″. I was able to then trim or square up each of the units. This definitely took more time but well worth it. Each week I am concentrating on improving my piecing skills. Some weeks I am trying out different rulers but most weeks I will be using triangle papers.

SLOW AND STEADY WINS THE RACE.

 Generally, I do not press my seams open. I must confess that I am a bit lazy when it comes to pressing. So to keep it real and make me accountable I decided to show the back of my block. Where the seams got bulky I did press open. There is still some bulk where the tip of the flying geese blocks was but that is okay with me. I will deal with that.

One thing I am going to work harder on is starching my fabrics. Lisa Bongean did a great post on the Blockheads FB group about starching. If you didn’t see it, here is the link.

https://www.facebook.com/groups/253867175058745/permalink/825040994608024/

Now visit each of the designers listed below to see their version of this week’s block.

Thanks for stopping by.

Be sure to check out the Block Heads Facebook Group and look for Block Heads 3 on Instagram – #modablockheads and #modablockheads3.

Blockheads3- Sherri McConnell

SUNSHINE STAR

Welcome to block 2 in the Blockheads 3 series.
( that sounds weird)
This week’s block is designed by Sherri McConnell of A Quilting Life and she is one of the sweetest people I know. I will probably be saying that a lot on my Blockheads posts because I do think these gals are the best!

I am not sure what my layout is going to be so I am making some of the simpler blocks in a variety of sizes. If I don’t use the 4″ blocks they can always be used as quilt labels, pincushions or parts of zipper bags.

My tip for this week is to sew the blocks in quarters.

Many of the blocks can be done this way and it helps with making sure the shapes are faced in the correct direction. It is also easier to chain piece the sections and then press the sections nicely and then join the 4 quarters together.

The flannel board is one of my makeshift boards using the cardboard from a layer-cake package, a piece of batting and some cloth duct tape around the edges. The cloth duck tape is available at many craft stores, hobby, and hardware stores. It is not available in the greatest colors but when in a bind and want to make a bunch of these boards quickly it works.

I am still playing with my fabric combinations by making a variety of sizes of blocks.

I hope you are having fun.

This week’s pattern available at Sherri’s blog.

I’d love to see your version of the blocks so be sure and tag your posts using

#modablockheads and #modablockheads3.

Thanks for stopping by. Be sure to check out the Block Heads Facebook Group and look for Block Heads 3 on Instagram – #modablockheads and #modablockheads3.

I will be at the Road to California show this weekend in The Moda booth along with Robin Pickens. Some of the other blockheads will be there also, Jen Kingwell, Lisa Bongean, so If you are coming to the show be sure and stop by.

I will also be doing a Sisterhood of Scraps book signing. Hope to see you there.

Enjoy,

-modalissa

Block Heads 3 – Corey Yoder

Welcome, Welcome to day 1 of the Block Heads 3.
My friendship group from several years ago was called the Blockheads, so when the idea of this type of project came up, we knew the name Block Heads was perfect for a group of like-minded people who are passionate about learning, making and sharing.

I am excited and nervous about being a part of Block Heads 3. I hope to keep up!

Each designer has supplied their block in an assortment of sizes.

Which size do I choose?

How do I know what blocks I am going to use?

How do I know how much fabric I am going to need for a year-long sew-along?

These and many other questions I am going to answer along the way but the most important thing is to have fun, be creative and enjoy the experience. But first, I have assembled a few of the “really would be great if you have” notions to make the process flow.

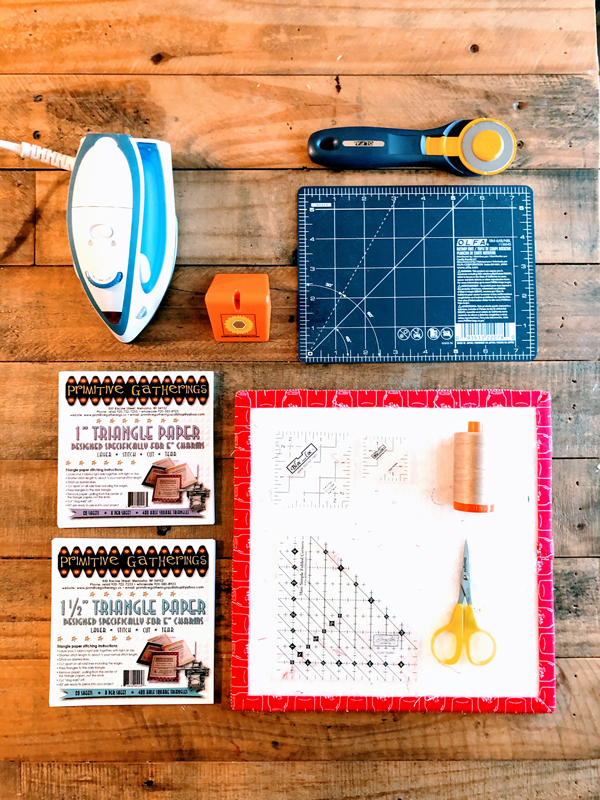
   + Oil up your machine, change the machine needle and thread using a neutral color of thread. I lean towards a light tan, light blue, silver or pink as my neutrals. The thread just disappears in both light and dark fabrics. Using high-quality threads does make a big difference in your project.

   + A small iron to keep handy by your sewing machine helps speed up the work no matter whether you press your seam allowance opened or closed. Even the larger blocks are made up of many small pieces so pressing is important.

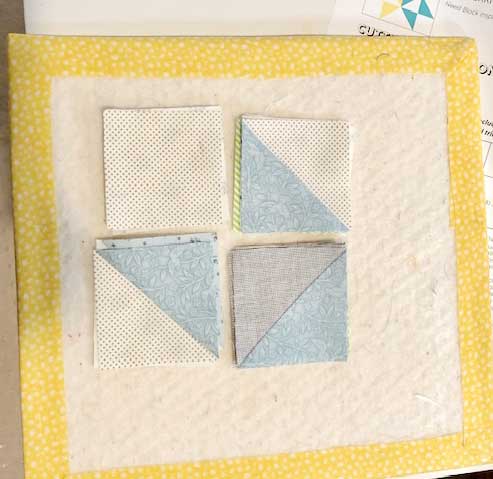
+ A rotary cutter and small mat to square up sections as you go. Generally, when a 1 7/8″ square is called for, I round it up to 2″, then cut and sew into half-square triangles, press and square the blocks. This is also where the 1  1/2″ and 2″ bloc-loc rulers come in handy.

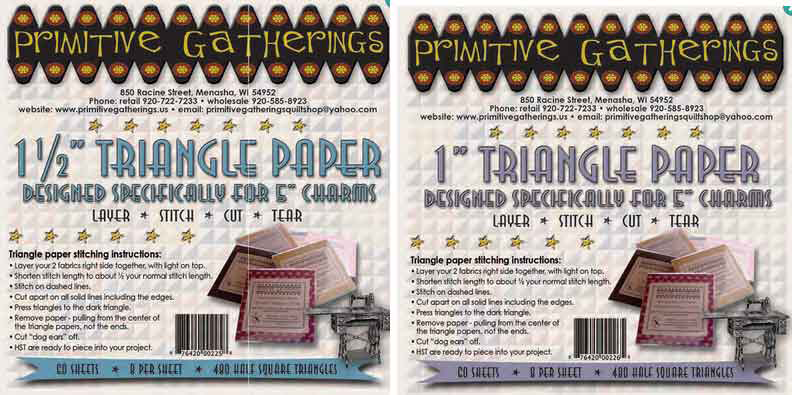
+ When more than a few half square triangles are needed for a block I use Primitive Gatherings triangle papers. The papers are fast and accurate. NO additional trimming is needed because they finish at the exact size needed. Give them a try!

 + Simple Folded Corners ruler by Antler Quilt Designs is also one of my must-have rulers.

+ Small portable design boards. Layout your fabrics as you cut them to audition your fabric choices or to keep the fabrics in order when it is time to sew. You can make these yourself by using any size of the cardboard, batting scraps, and fabric binding or fabric duck tape works nicely also. I often use the cardboard piece that comes with layer cakes. Fat Quarter Shop has a variety of sizes already made also.

+ Thread cutter by Sunflower Quilts is perfect to have to quickly cut apart all the chain piecing.

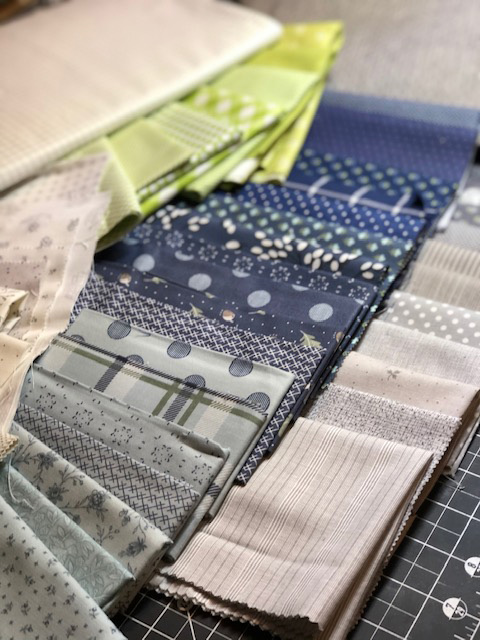
What fabrics am I going to use? When doing a mystery project like this, you want to make sure you have quite a bit of each fabric or a large variety of fabrics. I opted for a large variety. Picking fabrics is one of the hardest things to do. Trying to decide on the perfect 18- 24 fabric is a tough one, so I wanted to share my trick. I like to pull all the fabrics that I think may even be close to what I am looking for. Lay the fabrics out in color order and start eliminating. It is much easier to take fabrics out of the stack than to build only the perfect stack with no rejects. This frees you up to choose some fabrics that may add a pop of color, a little clash fact, or or a variety of scale. Also, keep in mind how many colors you want. Odd numbers work best. Shown above is the beginning of my first fabric pull. I added the medium blue as my 3rd color, so I would have the option of creating a medium. I also choose lots of different lights for my background, keeping in mind that I would need small scale prints.

Once I started sewing, I added many different fabrics and took away some that would not work. Don’t be afraid to change along the way. The quilt is a work in progress.

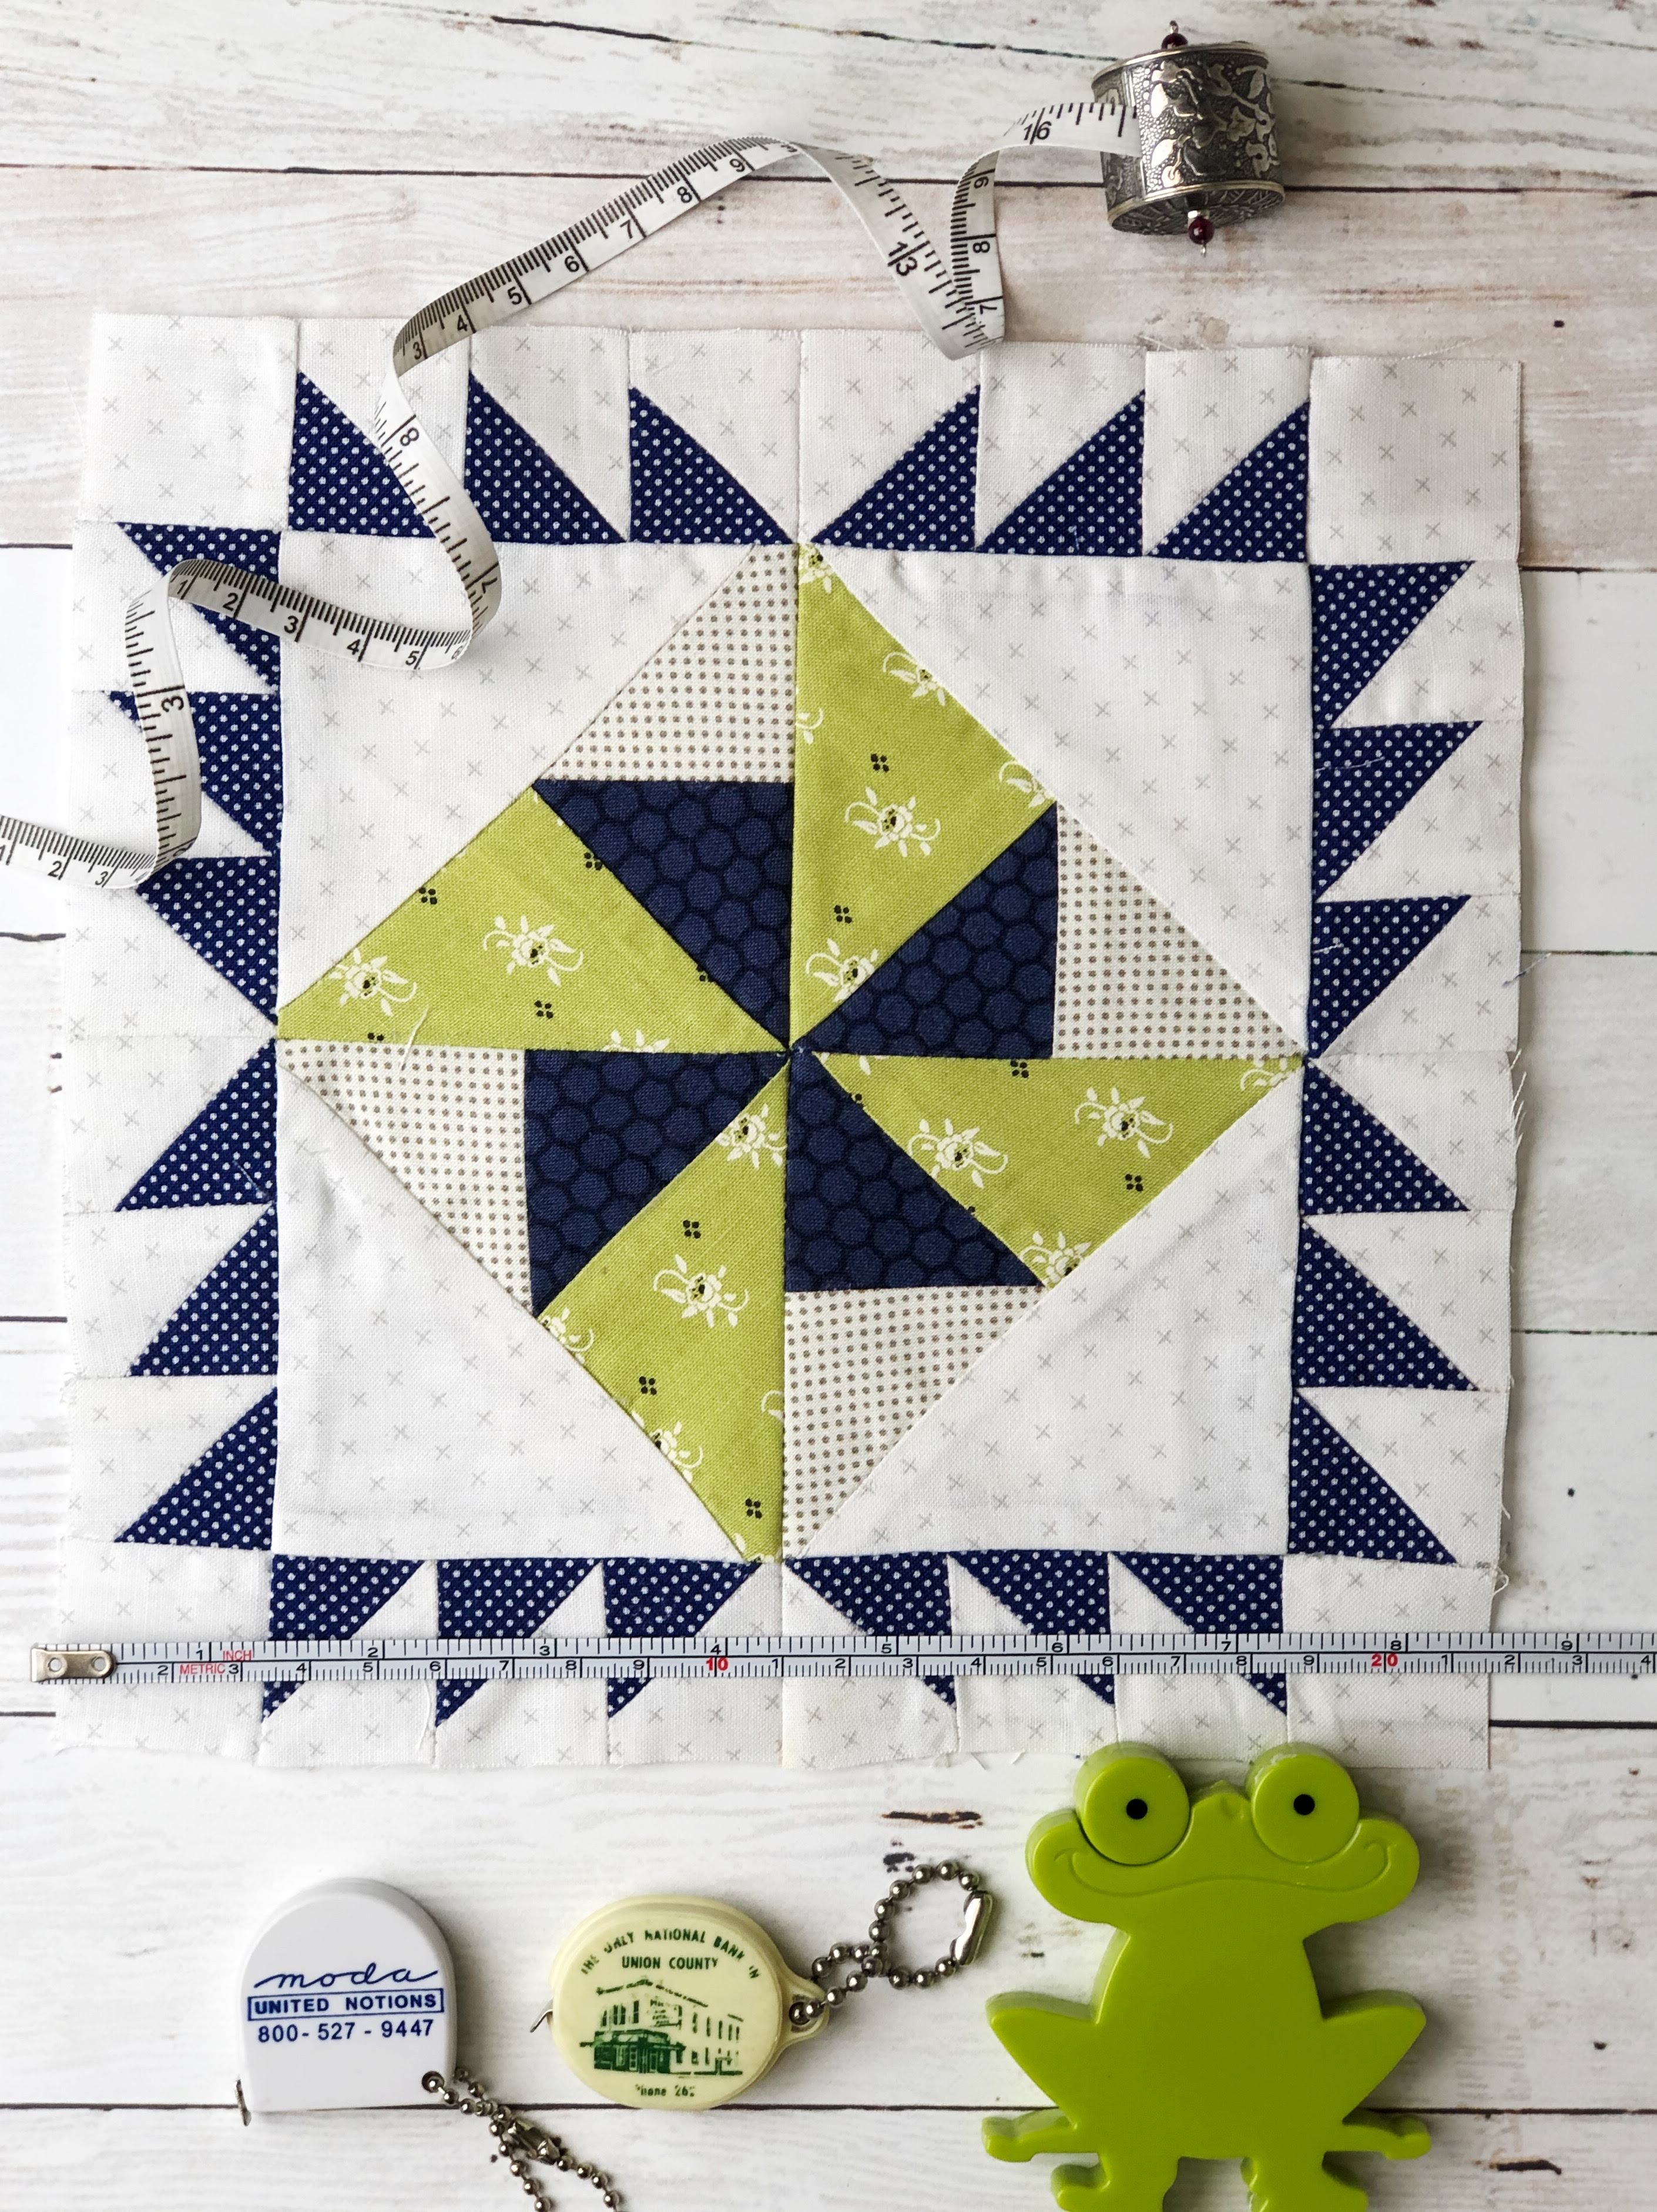
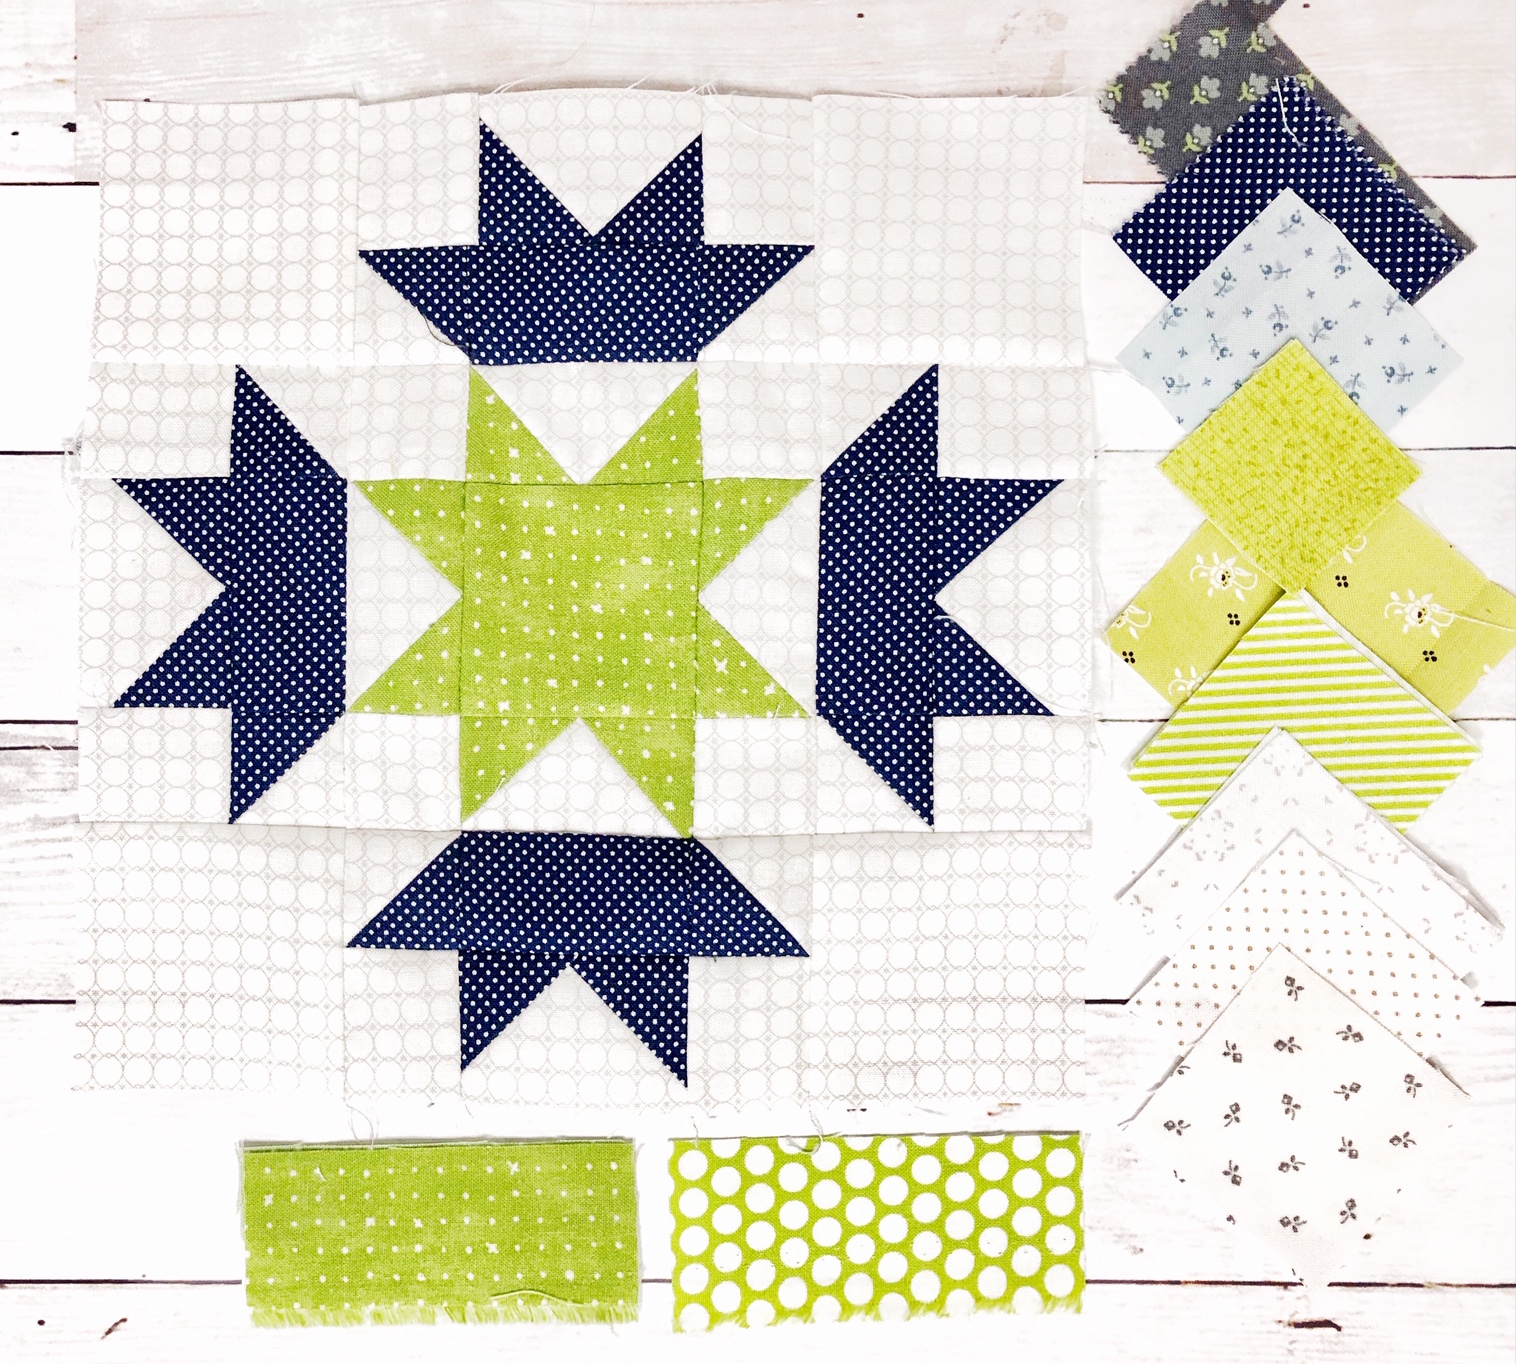
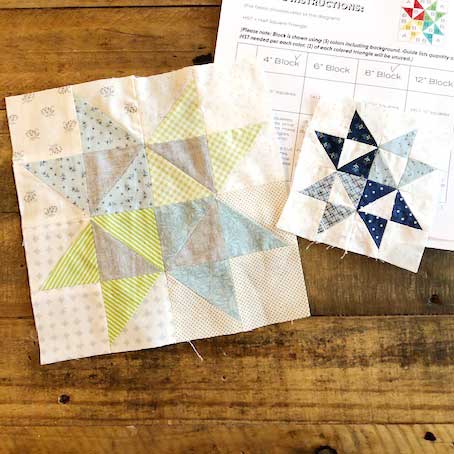
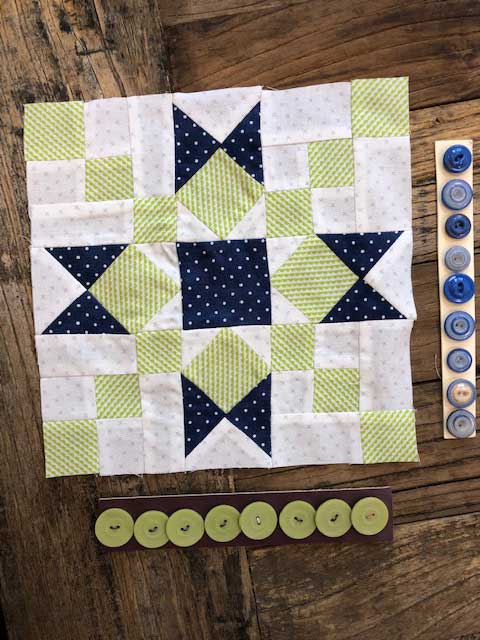
Star Crossed by Corey Yoder

For the instructions to Corey’s Star Crossed block – Coriander Quilts.

Corey’s block was tons of fun to make. I choose to make the 8″ size.

Many of the blocks are available in a range of sizes from 4″ to 12″ so I am planning on making all 8″ but playing around with a few 4″ and throw in a 12″ from time to time.

One of my favorite things to collect is quilt block patterns, whether they are in books or online. Each week I will also share a few of the other trinkets that I collect. This week I am sharing a few cards of vintage buttons in greens and blues.

Be sure and visit each of the other blockheads each week for their blocks, tips, tricks, and additional info. Some of the designers already have given layout options, so that should help guide you in what size blocks you want to make. Moda will also be supplying a few possibilities of layouts for mixed sizes of blocks.

There are fourteen different designers:

Thanks for stopping by. Be sure to check out the Block Heads Facebook Group and look for Block Heads 3 on Instagram – #modablockheads and #modablockheads3.

Enjoy,

Modalissa