Go-to Book

Todays Mistletoe Make and Bake
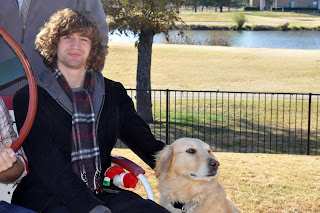
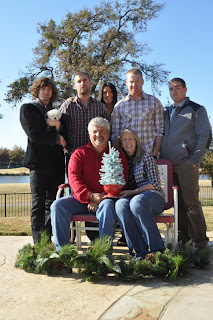
designers of the day are:
ME – You are here.

Todays topic is…
What is your Go-To Holiday book?
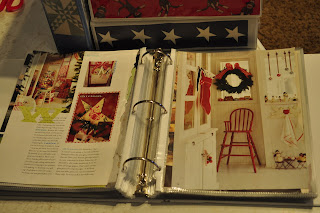
I have made my own Go-To Book. Now I know there are all kinds of great writers, artists and designers out there. Pick one? I just couldn’t do it. Maybe it is the middle child in me.
Make my own book? I have notebooks full of decorating ideas for the holidays. You may remember that yesterday’s post was Holiday Sanity Savers. This notebook is definetely not a sanity saver because there is no way my home would ever look like the pages out of a magazine. Someday, I may be able to twitch my nose and make it happen but until then I will enjoy using the pages as design inspiration.
I am not worried about anyone knocking on my door to publish my work of art.

I have notebooks for all kinds of topics, yet my favorites are Christmas and Fourth of July.

I have a book of articles about people. Some I know and consider my friends, some I hope to someday meet.
A book of gardening ideas for when my thumb finally turns green.
A book of quilting ideas.
A book of baby (grandbaby?) ideas.

I hope I have inspired you to make your own Go-To book.
Supply List: Large 3 ring binder.
(I use the kind with locking rings so the notebook doesn’t accidentally come open and the pages spill everywhere.)
Sheet protectors
Favorite pages from all your magazines 
Pages from the pile of mail order catalogs such as Pottery Barn, Garnet Hill, Anthropologie, 
and many, many more.
Today is my turn to share a holiday project idea. Hope you enjoy it as much as I did making it.
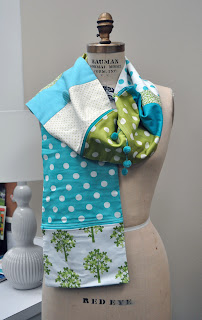
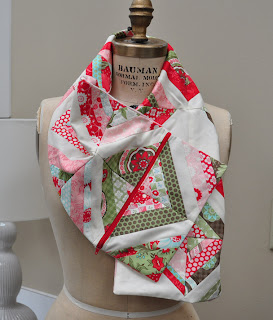
Girl Scout Scarf
8.5″ x 60″
A girl scout is always prepared. This scarf is full of hidden pockets and sections to hide just about anything.

I picked out with the back of the scarf first. I really wanted to use the Oliver + S interlock, so the scarf would drape nicely. This fabric determined the length of the scarf, approx 60″.  I choose assorted prints at least 9″ wide.  I decided to challenge myself on this project and try some new techniques.

ZIPPERS: Yikes, egads! I haven’t done a zipper since I flunked my sewing project in 5th grade. Due to the great tutorials and Terry Atkinson’s colorful zippers I decided to make zipper pockets.
I added a bit of embroidery because I love the look but rarely sit still long enough to do any.
I used different feet on my machine and gave my #37 quilters’ foot a rest.
(feet used but you do not have to have them to make this project-Zipper foot on the zippers and walking foot for joining the interlock back to the pieced front.)
Supply List:
Backing 9″ x 60″ (backing can vary depending on the size of the person and the type of fabric.After making this one I think 6-7″wide is ample.)
Assorted fabrics for front
Additional items to personalize your scarf such as zippers, trims, medallions, floss.
Zipper Tutorials:
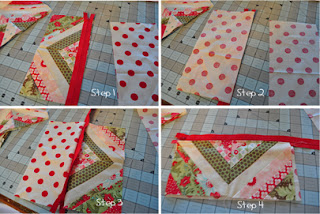
the pictures below are from the orphan block scarf shown below

Step1: Zipper and fabric right sides together.
Step 2: Add lining fabric right side together making a zipper sandwich.
Step 3: Sew along the edge of the fabric and zipper. Your piece will look like step 3.
Step 4: Fold the fabrics back wrong sides together and top stitch.

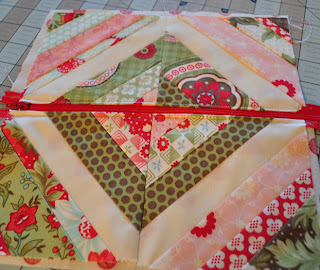
Repeat steps 1-4 on the other side of the zipper. Completed section shown above.
Once the zipper sections are completed, decide where you want the zipper pockets on your scarf. Continue joining fabrics together to make a 60″ long strip. Add assorted trims between fabrics paying close attention to placement on the scarf.

Do not add “things” to the middle section of the scarf. This area will be around the back of the neck and not seen. Add embroidery if needed.

Join the back to the front, right sides together, pinning sections in place.

Before sewing the scarf together, unzip one of the pocket sections half way. Sew the scarf all the way around the four sides. Trim the four corners to have nice sharp corners when the scarf is turned right side out. Use the opening at the zipper pocket to turn the scarf right side out. No hand work to close any openings.

Press the scarf. Top stitch above each of the zipper sections to create a pocket.
Ta Da! Just the perfect scarf to hold a spare key, cash, drivers license, chapstick, etc.
Additional ideas to Personalize your scarf:
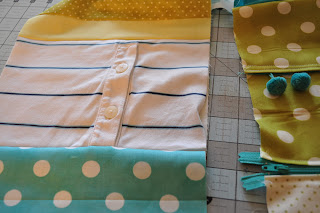
1. Add pieces of repurposed clothes. I added the button placket from my son’s shirt making an additional pocket. (I love buttons but did not want to tackle buttonholes) This scarf is for his girlfriend. It will come in very handy next time he locks his keys in his car after a concert in the rain. Maybe I should go ahead and put a spare key in one of the pockets!

2. Add fringe made from interlock.
Keep in mind the size of the person you are making the scarf for so the added fringe will not make the scarf too long.
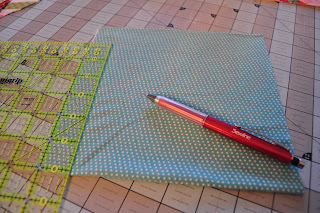
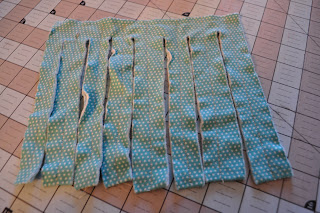
Cut an interlock section 9″ wide by 12″ long. Fold in half and sew along the 9″ side to hold in place. Mark every inch, sew from the bottom fold up 6″ on each of the markings. Cut  1/2″ from the sewn lines. Wet and toss in the dryer to fray the fringe. Size of fringe can vary according to what size you cut this section.

3. Monogram initials.
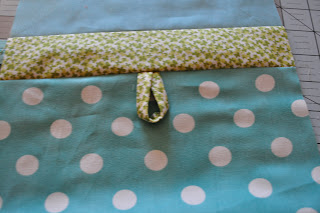
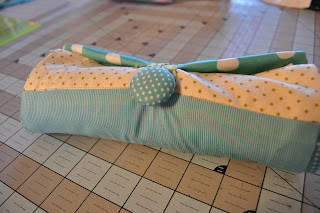
4. Add a loop and a covered button to roll the scarf into a handy take along.

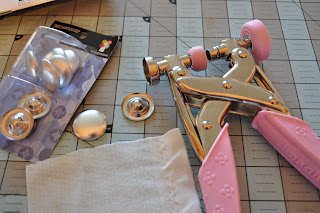
This was FUN to do using the brad/button maker. This item should be on everyones’ Christmas list. (Stock # 001309 suggested retail $29.99)  It is on my list, I borrowed this one from Ducky. The package says (WARNING: Making custom brads and buttons has been shown to become addicting.)


5. Sew with unusual fabrics such as snuggles, old sweaters, sweatshirts, and school t-shirts.
6. Tuck a gift card in the pockets to surprise the recipent.
7. Use orphan quilt blocks for scarf sections. I wanted to use BLISS flannel for the back of the scarf so, once again I started with the back to determine the scarf. This one is 43″long.
For printable directions, please CLICK HERE.
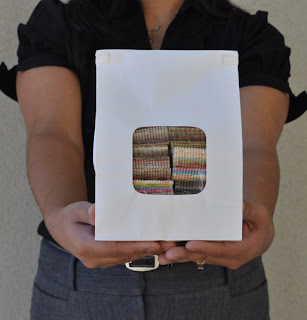
Leave a comment on my post today to win a chance at this adorable “cookie bag” of moda fabric. I will draw the yummy name and post the winner tomorrow morning.
Please make sure if you leave a comment that I have a way of getting
a hold of you if your name is drawn.

Cocktail Party Starters

oh I am at a total loss on this one….I am not a party person.
I asked my best friend for suggestions. She reminded me that I would go directly to any of the kids at the party. I guess I relate best to the young ‘ens. This does not help me at a “cocktail party.”
So I had to consult the expert, Gammy. (that’s my mom) Artist and Salesperson who has never met a stranger should be able to give me lots of pointers. My family also threw in their suggestions. Keep in mind they majority of them are males and in their 20’s.

Depending on what type of cocktail party, Muy Guapo! is usually what Gammy says to all the males.
(Spanish for Very Handsome.)  Cocktail party or waiter bringing a frozen margarita, doesn’t really matter. Works on both. She would be dangerous if she knew any more Spanish.
Other tips from the family:
Don’t wait for them to come to you.
Smile…
I thought you were a movie star…
Did it hurt when you fell from heaven? (this son was confused between pick up lines and opening lines)

Are you with the bride or the groom?
Are you on FACEBOOK?
I just learned that…FILL IN THE BLANK EVEN IF YOU HAVE TO MAKE IT UP.
Are you from around here?
Didn’t you hear me?
Remember their name and use it in conversation.
The rest were not suitable for print.
Never ask a yes or no question. Ask about their family, hobbies, etc.  What my dad always taught me comes into play here. God gave you 2 ears and 1 mouth. Use them accordingly. You will be surprised at how much you learn.

What I am lacking on Cocktail Party Chit Chat,
I have made up with my sister in laws, Oreo Cream Cheese Balls recipe.
CLICK HERE for printable version.
4 ingredients, easy to make,
looks and taste like Godiva chocolates

 Tip from my son Grant, Serve with “shooters” of milk.


Now be sure to check out the holiday projects that have been whipped up for you at Perkin’s Dry Goods , Patrick Lose and Kelly Ann’s Quilting

Sanity Savers

Today’s Mistletoe Make and Bake
designers are

There is no such thing as……Holiday Sanity Savers, but I will give it a try.

Get up an hour earlier or stay up an hour later every day… that will add one work day to your week.

Make lists for EVERYTHING. You may not be able to get it all done but at least you will be able to sleep. “They” say if you write things done it frees your brain from trying to remember it for you. (Your brain usually does this about 3:00 a.m.)

Don’t worry about finding all the presents you have hidden. Your kids will love the surprises when you come across the gifts in February.

Do not allow Santa to bring any gifts that say, “Some Assembly Required.”

Buy your own gift, wrap it very poorly, put a gift tag from your husband. Open it, act very surprised and  gush greatly. I am sure “he” thinks one of the kids did that for him. Works every time!

Don’t over scheldule! I finally learned not to set myself up for unrealistic expectations. The best things happen when unexpected.

Sanity Saver tied in with the recipe listed below.
CLICK HERE for printable version of recipe.

 When baking you must double the alcohol in any recipe. Do not put it in the recipe.
Drink it while you are cooking. I often add this to my Sonic Route 44 drink cup and
no one knows why mom is in such a good mood.

Christmas Trivia

Welcome to day one of the Mistletoe Make and Bake event.
Today’s designers is
Sherri Falls of This n That

Each day the designers will post about that days topic. They will each have a recipe to share with you. The designers of the day will also include a project that can be easily made as a gift for the holidays.
Leave a comment on each designers blog every day for chances to win the Grand Prize drawing.
So let the fun begin…. Today’s topic, Christmas Trivia.

A bit of information about Rudolph the Red Nosed Reindeer from Wikipedia.

Rudolph the Red-nosed Reindeer is a character created in a story and song by the same name. The story was created by Robert L. May in 1939 as part of his employment with Montgomery Ward.
The story is owned by The Rudolph Company, L.P. and has been sold in numerous forms including a popular song, a television special (done in stop-motion animation), and a feature film. Character Arts, LLC manages the licensing for the Rudolph Company, L.P. Although the story and song are not public domain, Rudolph has become a figure of Christmas folklore. The song tells the tale of Santa Claus’s ninth and lead reindeer who possesses an unusually red-colored nose that gives off its own light, powerful enough to illuminate the team’s path through inclement winter weather.

NOW for the Trivia Part
1.Which reindeer was identified as Rudolph’s father?
Donner
Dasher
Blitzen
Comet
2.The Rudolph the Red-Nosed Reindeer Television special was originally aired on NBC in what year?
1964
1976
1989
1992
3.What comic book company based a series of 13 Annuals titled ‘Rudolph the Red-Nosed Reindeer’?
Image
Marvel
DC
None of the above
4.This reindeer helps Rudolph fly at the reindeer games by telling him he is cute.
Janice
Judy
Clarice
Kimberly

5.What do they call the Abominable Snow Monster who pursues Rudolph throughout the adventure?
Bigfoot
Bumble
King Cold
Snowzilla

6.Who is the name of the jack-in-the-box at the Island of Misfit Toys?
Charlie
Jimmie
Eddy
Jackie
(clue in picture above!)

7.Also on the island of misfit toys was a toy bird who instead of flying did what?
Walked
Sang
Juggled
Swam
8.This Johnny Marks song featured in the special has become a Christmas Classic.
Let it Snow
Santa Clause is Coming to Town
A Holly Jolly Christmas
Deck the Halls
9.What does the misfit cowboy ride on for transportation?
A Horse
A Pony
An Ostrich
A Bicycle
10.Which of the following toys was NOT on the island of misfit toys?
A toy boat that sinks
A train with square wheels
A bicycle with no handle-bars
A squirt gun that shoots grape jelly

And the recipe of the day is Soft Pumpkin Cookies

Click here for a printable version of the recipe.

And the answers to the trivia questions are:
1. Donner 2.1964 3. DC 4.Clarice 5.Bumble 6.Charlie 7. Swam 8. A Holly Jolly Christmas 9. An Ostrich 10. A bicycle with no handle bars

Be sure and visit all the Mistletoe Make and Bake designers, leave a comment on each to be entered in the Grand Prize drawing. Here is the complete list.
November 15
Sherri Falls – This and That
Monica Solorio-Snow – The Happy Zombie
November 16
Heidi Kaisand – Hen and Chicks
Monique Dillard – Open Gate Quilts
November 17
Celine Perkins – Perkins Dry Goods
Patrick Lose – The Latest News from Patrick Lose
Kelly Ann Richardson – Kelly Ann’s Quilting
November 18
Lissa Alexander – Moda Lissa
Julie Stewart – Quilts4Julie
November 19
Roseann Kermes – Rosebud’s Cottage
Brenda Riddle – Little Acorns
November 20
Vickie Eapen-Spun Sugar Quilt
Melisa Morrison – Sweet Home Quilt Co.

Cooking and a bit of news

Happy Saturday morning,

As I begin cooking 5 recipes for the Mistletoe Make & Bake event happening next week, I thought I would share a bit of news. Gene, a moda salesrep sent me the following news.

Sad News

Please join me in remembering a great icon of the entertainment community. The Pillsbury Doughboy died yesterday of a yeast infection and complications from internal trauma associated with repeated pokes in the belly. He was 71.

Doughboy was buried in a lightly greased coffin. Dozens of celebrities turned out to pay their respects, including Mrs. Butterworth, Hungry Jack, the California Raisins, Betty Crocker, the Hostess Twinkies, and Captain Crunch. The grave site was piled high with flours.

Aunt Jemima delivered the eulogy and lovingly described Doughboy as a man who never knew how much he was kneaded. Doughboy rose quickly in show business, but his later life was filled with turnovers. He was considered a very smart cookie, but wasted much of his dough on half-baked schemes. Despite being a little flaky at times, he still was a crusty old man and was considered a positive roll model for millions.

Doughboy is survived by his wife Play Dough, three children: John Dough, Jane Dough and Dosey Dough, plus they had one in the oven. He is also survived by his elderly father, Pop Tart.

The funeral was held at 3:50 for about 20 minutes.

If this made you smile even briefly, please rise to the occasion and take time to pass it on and share that smile with someone else who may be having a crumby day and kneads a lift.

Hope you enjoyed this bit of humor. Wish I could pass along the smell of my kitchen. I am sure my family will wake up soon thinking I am cooking a big breakfast! Ha ! Ha!
Enjoy,

Quilt Aid USA 2010

Several months ago, I met with Helen from Pattern Press in Australia. She told me about a wonderful project that several Australian designers had been involved with. It had been such a great success she wanted to expand the project to America and include an American charity. Read all about the quilt project and the charities, here.

Quilt Aid (USA)…
helping the world, one quilt at a time
12 designers join with 6 shops to bring you a wonderful quilt.
Visit each of the 6 stores, purchase 2 block kits from each
of the stores to total 12 blocks. Each of the stores will also have a finished
quilt pictured. Choice your favorite layout and purchase
the finishing kit to complete the project.


 To read more about the designer’s, visit here.
The blocks are made featuring Collections for a Cause- Hope by Howard Marcus. Visit moda’s website to read about all of the Collections for a Cause fabrics and the charities they support.
Blocks went on sale beginning November 1st and qtys are limited.

Mistletoe Make and Bake 2010

I am  super excited to be included with  these talented people in the
Mistletoe Make and Bake 2010.
Join us as we share recipes and projects for the holidays along with giveaways!
Mark your calender and spread the word by sharing the fun on
your blog, Twitter, and Facebook.
Each designer will feature a project on the following days.
Leave a comment to be eligble for the GRAND PRIZE drawing.
November 15
November 16
November 17
November 18
(yeah- that’s me- I feel like I have made it to the BIG TIME)
November 19
November 20
Vickie Eapen-Spun Sugar Quilt

Fashion stops at the knee..

There is a saying at the quilt trade shows,
Fashion stops at the knee.
What this means is you better have comfortable shoes because
you are going to walking all day on hard concrete floors.
It is not the walking, it is the walking then standing in one place that turns your legs into cement anchors.
SHOES…. are a very important part of the trade show ensemble. Very rarely will you see anyone in spiked platform heels. Anne Sutton from Bunny Hill did a blog post last Market about all the shoes
she “auditioned.”
Barb and Mary from Me and My Sister also did a hilarious blog post about shoes. Barb said she was buying shoes because it was the only thing she didn’t need to buy in a larger size.

So you can see even though the shoes do not have to be the
height of fashion, they are very important.

The owner of Moda Fabrics is very well known for his fashion
and his shoes. He is often approached at market just to see what he is
wearing! Those of you that know him, am I right?
When Cheryl and I were
we came across the greatest thing ever.
The fish really looked like it was swimming around.
We were really trying to think of why we needed to buy these.
 Possibly a Christmas present for the boss?
We laughed and laughed.
So I began to “audition” shoes I would NOT be wearing to Quilt Market.
Possibly? Denim goes with everything.
Oops, over the heel height restrictions.
How cool are these?  Gucci?  Jessica Simpson?
 I don’t think any shoe that starts with Granny in the name should be considered.
(Granny boots in case you are too young to know about these.)
I could add some wheels to these and have a perfect pair of skates for the show.
Hey I think I am on to something. You better not steal my idea.
It is amazing what all can be found at the antique shops!!
I have no idea what shoes I will be wearing
but they will be
boring
and
comfortable.
Market- 1 week….. to late to break in a new pair. Pack the blister bandaids.
-modalissa

Hard to find a good model

 Making the quilt is one thing, right?
Choosing fabrics, time to piece it, quilt it, tie it or pay someone to quilt
for you. (thanks, Maggi!)  Of course, if you are going to blog about it, you will need a picture.
You know the drill, timing is everything when taking a picture.

 I have been working on

many things but I cannot show them yet!! (MARKET!)
So while I was waiting for the new moda fabrics to arrive, I completed
many (a few) of my UFO’s.
This quilt is the first in a series of “giant blocks” quilts I am working on.
This pattern came from allpeoplequilt.com’s
website as one of the 2010 quarterly challenges.
 I really wanted some great place to photograph this quilt. The photography
is  the most intimidating part of having a blog.
Camille always encourages me! She never laughs at me when
I ask her a stupid question. Thanks, Camille!
It is so fun and it is made
from all Dots! Yes I am a moda-dot-alot. Give me alot of dots from moda!
  I solicited one of my sons (# 2 on the pecking order, but he says #1 in my heart)
 He had food in his mouth and wouldn’t stop eating long enough to “Model.”
 Then he started “bullfighting” with the dog.
Even Kobie the dog was bored and wandered off.
 
 Maybe his whimpy arm muscles would not hold up the “heavy” quilt.

And finally a quilt picture …..with legs!
A couple more of the other U.F.O.’s that I have finished.
The Owl quilt that Holly Hickman designed from Spring Market.
I put snuggles on the back. Love it! More about quilt backs in a future post.
 I finally finished this jelly roll quilt. All of us at work make this
pattern from almost every collection. It is our go to pattern. This quilt is
made using Botany by Lauren and Jessi Jung
They say in “sew business” that it is tough to work with kids and pets. 
Both my son and dog seemed bored with the whole event. Next time, maybe I will wait to feed them until after the “photo shoot.”
Off to sew another top-secret market project.
-modalissa