Tag: Moda Fabrics

Moda Roll Call

Hello to all,
It was nice seeing you at Market. If you did not get to attend Market please join me with a cup of afternoon tea. Each day we will be featuring one of the moda designers as they share with you their new fabrics, Patterns and products.
So as the old Partridge family song goes, Come on let’s get HAPPY with Barb & Mary from me & my sister.

Happy will be available is stores this September.

Roll the Credits

Market, or at least the moda booth, is similar to putting on a big screen production. Months of planning, shooting, cropping, layouts, and editing. Of course we have all of the “Stars” such as the designers, each taking part in their major roles.
I thought I would roll the closing credits before the “movie” even starts and thank those that worked off screen.

Closing credits, in a television program, motion picture, or video game come at the end of a show and list all the cast and crew involved in the production. They are usually shown on the screen in small characters, which either flip very quickly from page to page, or scroll from bottom to top of the screen.

Producer and Director    Mark Dunn
Design Director  Cheryl Freyberg  
Graphics          Holly Hickman, Susan Stiff, Alison Scully
Production     “hounddog” Outlaw
Layout          Eladia A
Assembly     Mariza, Esperanza, Michelle, Chelair
Bindings     Carolyn, Mary Ann, Kellie, Kathy, Ducky, Shinn, Sarah S, Sarah D., Sherron, Stiff and anyone else walking by
Quiltmakers   Carolyn, Mariza, Debbie Outlaw, Ducky, Barb Shinn, Holly Hickman, Kellie Trimble,  Susan Stiff, Alison Dale, Kathy Bauer, Pat Fair, Sarah Stephenson
and Nancy Galbraith.
Quilters          Maggie Honeyman, Carol McLeroy, Sue Needle, Connie Keller,
Emily Keller, Valerie Sneed, Alicia Key, Karen Niemi   
Quilt Designers and Writers Susan Stiff, Lisa Christensen, Holly Hickman, Debbie Duckworth           
Gaffer, Booth Assembly       I had to look up this one also. Hassen, Sara and their talented crew.
Best Boy   I saw this in the credits once and always wanted one of these. Juan Carlos
Packing and Shipping    Victor Snead   
OKAY, Lights, Action, Camera…
Let the SHOW begin. See you all at the “cast party.”

Twister- the ruler, not the game

Marsha from Country Schoolhouse in Superior, Wisc is located at the tip of Lake Superior in Northern Wisconsin. This is where she created a MUST HAVE ruler to use with Moda Layer Cakes TM and Charm Packs.  The ruler is called the Twister. I have tested the ruler using Park Avenue by 3 sisters in stores May/June 2010.
These are the easy steps to why this is the MUST HAVE ruler.
Step 1
step 1
Arrange your layer cakes in a pleasing order. Sew them together. Add a border. For future reference I am going to call this piece a quilt top. You will cut this apart and sew it back together.
Step 2
step2
This is where it gets fun! Lay the ruler on your quilt top lining up the lines as shown on the ruler instructions. Continue cutting across the quilt top.
step3
This is the left overs after I cut the squares. There is a tiny amount left when you cut each of the squares so be careful as you cut.
step4
Step 3
“Twist” the blocks one turn and sew them together into rows. The only word of  caution is that the blocks are on the bias so be careful sewing them together. The border from your quilt top automatically makes a border around the pinwheels when sewn into rows. Pretty Cool!
block
Sorry about the brown carpet and the brown fabric but I think you can get the jist from the picture.
laying out the rows

Keep the squares in order and sew the rows together.
Step 4
final
Add additional borders as needed.
Ask for this ruler at your favorite quilt store. It is available in 2 sizes.
Order Lil’ Twister to use with charm packs.Stock # LTW5
Twister ruler works with Moda Layer Cakes.  Stock# TW10
Quilt and bind as desired.
Enjoy!

Martinque quilt and McCalls Magazine

I am honored .
One of  my quilts was chosen for a McCalls magazine. On shelves now.
The flat picture of it does not do it justice. You have to click on the link and see the styled shot.  Maggi Honeyman worked her magic once again on the quilting! No matter how beautiful the fabrics or how intricate the piecing, it is the quilting that adds such texture and dimesion. McCalls Quilting May June 2010 Cover
Yummy! The quilt kind of looks like schools of fish swimming through the tropics.

Dreaming of Diamonds

Martinque quilt in McCalls May June 2010
The moda retreat for shop owners is next week. I think I will hang this quilt on my office wall so I can show it off. Thanks McCalls for featuring little ol’ me.

Prairie Points and Pillowcase tutorial

Moda Fabrics is a sponsor of the Million Pillowcase Challenge with American Patchwork & QuiltingI asked Jennifer Keltner, Senior Editor of American Patchwork & Quilting, what her inspiration was for such a big project. Here is Jennifer’s reply.
 The inspiration for the project came from wanting to launch something that everyone could participate in—no matter what your skill level. With a pillowcase, it is fun and easy to make, doesn’t take a lot of time, and is certainly a way to showcase great fabrics you might not otherwise work with (don’t fit your usual style, color, etc.) It’s also a great way to practice a new-to-you technique such as prairie points, foundation piecing, diagonal block seams, etc. By incorporating that technique in a pieced pillowcase band, you can experiment first before making a commitment to a big quilt project.

On a very personal level, I was touched by two stories which made me think about the power of pillowcases making a difference. One was from a guild member who knew that in her area foster children had all their possessions tossed into a trash bag when they were moved from place to place. She vowed to have her guild donate pillowcases so every foster kid in the county could tuck their few possessions into a handmade case and have a soft place to rest their heads during trying times. The second was a story of a mother who made pillowcases for her son who was in a cancer ward—she was desperate to brighten up his room and his day. She did, and after he passed away, she had the courage to keep on creating them for the other people’s kids in the same tough spot. She and her husband eventually formed the ConKerr Cancer Foundation to make a difference for kids with cancer around the country by making pillowcases. Turning their grief into an ongoing effort for good really spoke to my heart.

I’m so touched by the hundreds of stories and emails I’ve read about where and how people are donating cases. The ultimate story of how the Million Pillowcase Challenge is an outreach to others came to my attention last week. Check out this girl learning to quilt with her mom, very inspiring girl (you’ll know what I mean when you check out her blog). Scroll down to the Tuesday, February 23 posting and make sure to click on the link to her friend Kristen’s blog to see how touched her friend was to receive the pillowcase. If this story doesn’t give you goosebumps….whoa! The power of quilting and motherhood and pillowcases and big hearts all rolled into one!
http://sarahely8989.blogspot.com/

Thank you Jennifer

The staff here at moda fabrics have been feverishly making pillowcases. We are addicted! Jennifer also told me that they have a goal of 1000 pillowcases to be made by their staff. I will have to let the Moda crew know about that goal. The following pillowcase is a tutorial of the pillowcase I sent to APQ.

finished-pillowcase

The following is actually 2 tutorials, Prairie Points and Pillowcases.

PRAIRIE POINTS
Determine the size of Prairie Point you need. (I used a pattern from APQ  that required 3″ prairie points.)
I doubled that size and cut a strip, 6″ wide x 45″ long.

Fold the strip in half length wise and press to determine the middle. Start on one end of the strip and cut every 3″ stopping at the middle fold. From the other side of the strip make your first cut at 1 1/2″ then start cutting every 3″ being sure to stop at the middle fold. Your strip will look like the one below.
strip-cut-every-3-inches
6″ strip cut every 3″ alternating on each side so it it staggered

Lay the strip on your ironing board and press all the squares in the same direction. Leave the 1 1/2″ strip
loose. You will get rid of it later.

press-in-all-one-direction-with-a-tail

Then continue pressing all the triangles back onto themsleves in the opposite direction.

points-pressed-beforf-folded

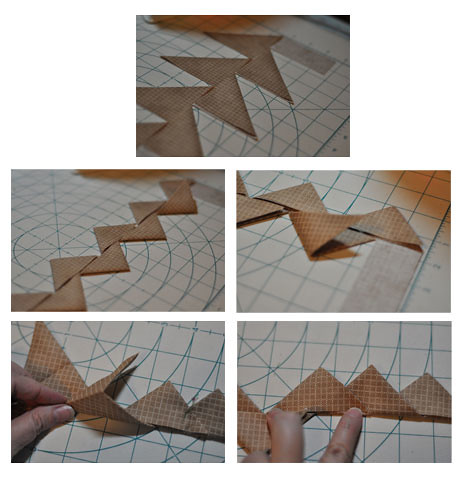
 The strip of “Points” will fold together to create your strip of prairie points.

ironing-and-folding-the-points

By pressing the points in the same direction you can “nest” each of the points into each other as shown in the picture shown below.

folding-points-tino-themselves

folding-points-tino-themselves2
The points all line up nicely and rest inside each other. This step if reminds me of a caterpillar. To hold the “caterpillar” in place you can now top stitch this down to hold them in place.

A couple of other notes before moving on to how I used it in my pillowcase.
If you want a strip longer than approx 41″ of points just make another strip and nest it into the last point on your strip. This is the perfect size  for making prairie point border on a baby quilt or throw.
The length of the prairie point strip will always be the length of the fabric. The only thing that varies is how many points and how far apart they are.
For example, cut an 8″ strip for 4″ prairie points and you will have fewer but bigger points. The strip will still be approx 41″/42″ long.
Cut a smaller strip 4″ for 2″ points and you will have a bunch of cute little tiny points. The strip will still be approx 41″/42″ long.
 NOTE TO SELF: Love the 2″ point idea. Go make some tonight.

DISCLAIMER:
The instructions listed below are almost like doing a magic trick. Everytime we finsh one we say Ta Da!!
However it is very hard to illustrate it in pictures. So my word of advice is to make a sloppy copy pillowcase just in case you mess up. And I also want to say TRUST ME! you will love this method. It is two seams! remember Magic! TA DA!

PILLOWCASE CONSTRUCTION:

Pattern used is one of the free downloads from APQ.
Fabric featured  is Whimsy by Fig Tree & Co.
Casing- Cut 9″ x 45″
Body of pillow 28″ x 45″
You choice of small flange, ric rac etc.
In the instructions below I have used the prairie points from above.
prairie-points-pinned-to-casing
 Lay CASING piece right sides up. Pin the points or trim of your choicealong the edge.
With me so far?

prairie-points-pinned1

Lay Pillowcase fabric right side down towards casing fabric.  Lightly roll the pillowcase fabric until you can see the casing fabric below. This will seem odd but it does work.

casing-pinned-to-pillowcase
 Taking the exposed casing fabric and roll it up to the top enclosing the entire pillowcase fabric. Pin  together. Now you may think that you are making fabric sausages, but you’re not. This is also where you have to really trust me.

pillowcase-rolled-in-tube.

SEAM 1: Sew the tube together. I know it seems odd, but this IS where the magic happens.

casing-sewn

Once you have done this step, literally grab a section from inside the tube and start pulling. (Love my great picture?This is where I needed the video.) Keep pulling until you have turned the entre thing right side out.
TIP: You must say TA! DA! as you pull so that the magic happens!

in-a-knot

This is what it looks like when it comes out of the tube. The casing is completely sewn without doing any handwork!

pillowcase-flat

Fold the Pillowcase right sides together.
SEAM 2: Sew down the side and across the bottom.

sides-pinned

You now have a finished pillowcase. Serge or Zig Zag the edges if you choose.

finished-pillowcase

Sleep tight!

Tutorial

For those of you that do not know this, quilt Market is 2 weeks earlier this year. In the long run this will be a good thing but in the meantime I think it is STRESSING out a few people. I have been reading designers blogs who are designing, writing, sewing, stressing. Seriously, there is not enough Chocolate or Pizza to go around this time of year. Don’t believe me, just read Sandy Gervais blog. This time of year is like Christmas, you can’t change the date. It is coming no matter what. The only thing that is stopping it is the deadline. If Market was later, we would all try and do more and more and more. Look at it this way… now there will be more time between Market, Halloween, Thanksgiving and Christmas. (Opps didn’t mean to stress you out more !)
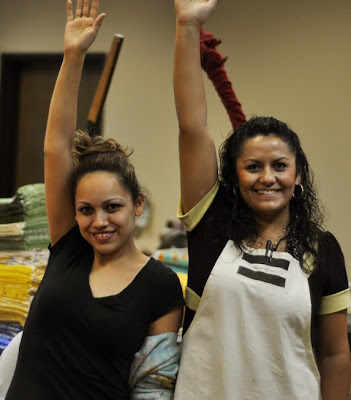
The girls are going to kill me but I have done this any way. DISCLAIMER: It is Saturday here, No makeup and they did not know what I was going to do with these pictures. I think they will be tooooooo busy to sign on to the computer until after Market.
Here is the tutorial: When you read this you MUST follow along and do it.!
STEP 1: RAISE YOUR RIGHT ARM STRAIGHT UP IN THE AIR

Mariza and Esperanna- Sample DeptCarolyn- Queen of everythingSTEP 2: BEND YOUR ARM BACK AND TOUCH YOUR LEFT SHOULDER.Eladia and Outlaw-Sampling and book and pattern buyerSTEP 3: PAT YOURSELF ON THE BACK! GREAT JOB EVERYONE! (are you following along? Stand up and pat your self on the back. This is a tutorial you can do right now. Do it!)Sorry Outlaw but I had to use this picture. Outlaw always shuts her eyes in pictures so I clicked the camera quick to try and get her. PRICELESS!Pat someone else on the back, then laugh and have some fun! Okay back to work!!

Giveaway

Giveaway?
Did that catch your eye?

I just recieved a copy of the new Holiday Issue of McCall’s quilting December 2009 issue. I was excited to see my quilt made the cover, AGAIN… folded and stacked with designers such as Chloe and Colleen from Toadusew, Sarah and Delores from Homestead Hearth and a dear friend, Gerri Robinson from Planted Seed Designs. And of course much more inside.
I do not know if you know of the MANQUILTER, but he is who quilted this quilt so I thought I would give him a shout out also. Isn’t that a great word, Manquilter? Of course you have to say it in a deep voice for the full effect.
Yes I said giveaway… keep reading.
The gals at McCall’s are so clever. They did a quilt option using the same pattern but did it in 30’s fabrics and used embroidered tea towels as the centers. Just that idea alone is worth running to the store to pick up your own copy. (pg 64)
Also there is an ad on page 49 from moda about something new available in stores late October. Clue- Fanfare Gift Wrap. Check it out.
Here’s the deal. Thanks for reading to the end.
The giveaway is for a magazine and my scraps from this collection. Scraps?! I have good scraps and after all it is a free giveaway. Rounneries will be in stores soon, so once you win my scraps you can order all kinds of yardage from your favorite shop.
I mean run to the stores this group is going to go fast!
Just make a nice comment and you will be entered. Drawing will be September 30th.

and the winner is…

Hello to all,
I learned something about blogger. If you make a post and save it to be posted at another time, it doesn’t work like that. It was a tie between Alesiha and Another Amy with both guessing 987. The number is 985. I guess officially Another Amy is the winner because her guess came in first. (Aleshia I will send you something for second place)
Working hard on fantastic new stuff for Quilt Market. The new things will be avavilable in Stores beginning September. Check some of the things out by going to the moda designers blogs listed in my side bar.
I thought I could at least show you a sneek peek of 2 of the projects i am working on. When it is quilt market time we tag team on alot of projects. I think one of the quilts has about 6 different people working on it. I wish i could tell you more but the shops get to see it first in Pittsburgh. Check out the moda designers blogs!I maybe posting a few twitters bits of info as the countdown to market continues.

Gotta go sew, sew, sew,
toodles,
Lissa

What Happens at Retreat Stays at Retreat-NOT

The retreat was not in Vegas but in Bennigton, KS at Lynne Hagmeier’s. No pictures can do the place justice. It should be on the National Museum register. It should also be featured in all decorating and collecting magazines. INCREDIBLE! (we all said, “How does she dust?”)

Some information does stay at the retreat…………..

How much food we ate….Any of our new boyfriends…………………………Any discussions of politics or religion…………..
So some of the stuff I can talk about.
Why does it take 14 hours for an 8 hour road trip?
Well, first stop and first credit card swipe was Oklahoma City Quiltworks. Love this shop! I can always find something different here. (thank goodness the many antique shops did not open until 10:30 or else we would have turned it into an 18 hour road trip.)Another “A-word” Antiquing. In Wichita, KS at Paramount Antique Antique Mall, there were only 3 of us, but it is still a race to get inside to the treasures. We pushed on to arrive in Bennington in the dark. I live in Dallas so driving dark country roads with no signs was an adventure also. The retreat officially began. Lots of laughing and visiting by all.
Day 1: Imagine shopping with Sandy Gervais of Pieces from my Heart, Alma Allen of Blackbird Designs, Amy Bradley of Amy Bradley Designs, Sandy Klop of American Jane, Barb and Mary of Me & My Sister, Terry Thompson of Peace Creek, Laurie Simpson of Minick & Simpson, Jan Patek of Jan Patek Quilts, Barbara Brackman (check out her new blog-post a comment and tell her I sent you) and of course our hostess, Lynne Hagmeier. Yes it was heaven. Sandy Klop was shopping for props for her booth at market with scads of suggestions by all of us. (secret!?) By the last day we were all shopping for each other. Through the power of technology, we actually did some shopping for some of the designers that were not there. Take a picture, send it to them…you want it or not? This group is just that kind of crew, always looking out for each other and willing to help spend each others $$.DAY 2: More shopping. Oh, did you think retreat meant we would be sewing?

We also hit any quilt shop in our tracks. The Quilting Bee in Salina, KS had a display of Lynne’s fabrics so I couldn’t resist making Lynne strike a pose. (you know they all hate me taking pictures-Thank you, Lynne) We played games. Read all about it on Laurie’s blog. We ate lunch in Abilene, KS at Mr. K’s Farmhouse Restaurant. Ed and June Kuntz
welcomed us. (June is a quilter and Ed could talk quilt.) Ed took our picture and asked us to say “muslin” instead of cheese. He won us over! Alma is holding a jar of their homemade salad dressing. All the pie boxes are hidden. Go to their site to read the history, salivate over the menu and learn more about President Dwight D. Eisenhower in Abilene. Material Girls Quilt Shop was closed by the time we got there, boo hiss. Maybe next time. I even found an outfit to wear to Market. What do you think? Flats or heels?
I am so energized by all the talent, creativity and knowledge that was shared. I could go on and on about my 3 days in Kansas but that is it for now. Oh ya, road trip home, 9 hours, only 1 detour and 1 speeding ticket scare. Whew! He got someone else. We were already trying to figure if we could talk him out of a ticket with moda fabrics.

Selvages – Tell a Story

The saying…. every quilt tells a story has been true since the beginning of the needle & thread. The selvage also tells a story. (some say selvage some say selveldge – potatoe or potato or papa if you are in Spain, right Joanna?)

wikipedia defines selvage as: In a woven fabric, the selvage (or selvedge) is the uncut edge of the fabric which is on the right- and left-hand edges as it comes out of the loom. As such it is ‘finished’ and will not fray because the weft threads double back on themselves. The term also refers to the unfinished but structurally sound edges of flat knitted textiles.
Very often fabric near the selvage is not usable as it may have a different weave pattern, or may lack pile or prints that are present on the rest of the fabric requiring that the selvage fabric be cut off or hidden in a hem. Not usable…. if they could only see how selvages are being used.

The selvage is so full of information. It shows how many screens it takes to print that fabric. It tells the order of placement for each screen.
(have you checked out the selvages on some of the chain fabrics?…not very many dots there)

I like to sew a piece of the selvage on the back as I am adding the binding. I then whip stitch it down to the back of the quilt. What does this do? Mainly it just helps me remember what collection was used in the particular quilt. I don’t use this as the label but it does document the quilt for historians down the road.
So imagine how intrigued I was when I discovered Karen Griska’s book, Quilts from the Selvage Edge. Her blog is a must read. I invited her to make a project for the moda bake shop using the scrapbags. Have you heard of the Moda Bake Shop?

A couple of years ago, the theme of the Moda booth for Quilt Market was Selvages! Small world! So I started saving some of the moda selvages. After visiting with Karen, we thought we would both do a giveaway. I have come to grips with the fact that I am never going to make anything from the selvages I have saved. So I am going to give them away here. Just post a comment and talk about it on your blog. I will draw 3 winners Saturday the 14th. Karen is giving away the pillow she made for the bake shop. Go to her blog for details to win the pillow.

Karen said it was okay to include selvages of any width or length, so I did. It seems as if I have been wrapping that ball for days. I think the winner will be pleased. Images may appear larger, so I photographed the “Selvage Ball” alongside some of balls that were laying around my house. (the basketball is a kids size) 2 of the winners will receive their selvages in a gift bag. I don’t think I can get any more balls made. Can’t wait to see all the selvage projects out there.